Here are my favourite free WordPress themes of the month, most of them are responsive and I use loads of these for my websites.
1. Origin

2. NewsTheme

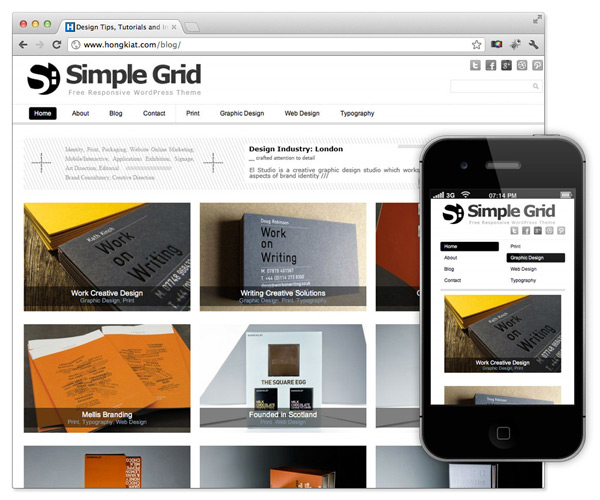
3. SimpleGrid
4. Desire

5. Path

Here are my favourite free WordPress themes of the month, most of them are responsive and I use loads of these for my websites.
1. Origin
2. NewsTheme
3. SimpleGrid
4. Desire
5. Path
People ask me all the time. How do you make money online. Do you go for Pay per Click type of things, or do you go for affiliate marketing. There is also the alternative of just blogging and putting some of that Google AdSense to get some money. There are many sources, but here’s what I think is the best way to make money online.
List Building.
Yes, list building. You might not make the money immediately, and the process will be long and difficult, but you’ve gotta start somewhere. But once you got a list that is responsive setup (and relatively big in size), you’re set for life. You will have that loyal following that likes what you do. That is interested in what you are doing, and will buy your stuff.
Unlike with search engine optimisation, this is sustainable. You ain’t going to have a new update such as ‘panda’ or some other inane animal name coming in and severely affecting the number of searches coming into your website. I think its not worth it if you’re going to waste so much time and money on optimisation when Google are so fickle. There isn’t a point.
A list gets you places.
Think newsletter service. Provide people with something that people want to know about. I’ve always said that people always want more information – hence the boom in e-books, and such. People want to keep learning. Many niches, I’ll just mention a few right here and I’ll pen another article about top niches in 2013.
I think the top one of course is “how to make money online”. After all, you are reading this article! I think the thing about that niche is that in essence it is teaching you how to copy their method – this being just to use that tagline of “how to make money online”, and because you bought it, you know it works. Hence of course you’re going to use their method.
Think your own product though. Its better to gain 100% revenue then just a cut for your hard work.
What I’m saying is that set up your list first. Then you can move on to bigger things.
Here’s just a short tutorial video showing how you can get rid of your Autocomplete History on Mozilla Firefox 17.
Steps:
1. Click on the “Firefox” on the top left hand corner
2. Scroll over “History”
3. Click “Clear Recent History”
4. There will be a form to select what you want to clear. Check Search History and Autocomplete.
Voila, you’re done.
Here’s how to change the URL that opens when you open a new tab on Mozilla Firefox.

Since the next GTA game is about to come out, I decided to treat myself to some Sleeping Dogs gameplay, and I must say, it is an absolute masterclass.
If anyone knows the movie Infernal Affairs, you’ll see the reference. I even Google-ed Sleeping Dogs and Infernal Affairs alongside each other, and a lot of other reviewers out there can see the obvious reference. A fantastic film, and one that I would recommend that you guys catch before or after playing this game. Both ways, it is nice. (remember to get a subtitled version if you ain’t Chinese like me :D)
So, the storyline goes like this.
It’s modern day Hong Kong (or at least close to it) and you play the role of Wei Shen. An inspector, and a coincidental bump into an old friend in Jackie (I believe, might have forgotten who it actually was) starts your mission of being an undercover cop.
A fantastic laid out game. Lots and lots of missions both as a cop and a triad member, and you got lots of chasing, hijacking and well, the world of the triads. You’ve also got that occasional police job, this being stifling out a gang which is smuggling. Quite simply, a fantastic game.
Love the environmental attacks too. There’s one scene where you can grapple (basically grab) an enemy and throw him on some marlin head. This game is not afraid to be gory, perhaps a bit unlike it’s GTA brother.
Got that GTA feel to it in terms of missions, the map, but it is a huge map. So many places where you can travel, and thankfully, you can take Taxis to your destination as well, which is a huge plus of the game. Really like it, don’t waste time with the traveling. Neat.
Personally a bit scared of Mrs Chu, one of the characters in the game who gets you to try and find the people who conspired to kill her son. She’s some sort of butcher/restaurant owner, so she kills all of them and mixes them into a stew. Lovely.
The story is fantastic. (I mean come on, this is essentially Infernal Affairs, one of the best Hong Kong dramas ever) Gameplay is fantastic. Definitely buy it! (although I’ve heard that the PC version crashes a lot, so you should go for the PS3 or XBOX 360 copy).
Happy playing!
A lot of people ask how to change the icon, or the favicon rather, of a WordPress blog, so here are a few easy ways to do this.
 I’ll be talking about how to change your Favicon on a self-hosted WordPress blog (this being the one with your own domain) and then I will move on to how you can change it on a WordPress hosted blog.
So, what exactly is that Favicon? It’s that icon beside your address, tiny detail, but it is attention to small detail that is essential to standing out on the internet.
![]()
Beside the website address, there is an icon, and that’s what I’m going to help you change it.
Method 1: A Plug-in (Self-hosted)
The plug-in is called WSA Favicon, and it is the most credible Favicon altering plug-in there is on the market. It is very easy to do, and quite simply, very self explanatory.
Method 2: Coding (Self-hosted)
Everyone’s scared to code. I know that. Even I am. But this is really easy. First of all, you’re going to have to get a 50×50 picture and either upload it on the internet, or have it ready. (you can just do a google search and use that address). So you’re going to need that address for the next step.
Next, you’re going to need to go to Appearances > Editor , and then you’re going to stick this code <link rel=”shortcut icon” href=”faviconpath” />. The “faviconpath” part is where you need to replace with the url of where your image is located. Easy.
Method 3: WordPress.com Users!
Very easy. Go to Settings > General . On the right hand side of the image, there is a part that says “Change Blog Icon/Picture”. Upload your picture there, and you’re ready to go!
Hey guys, today I’m going to be talking about the highly anticipated release of the Twenty Twelve WordPress theme.
First of, I would just like to announce that the theme has been made available on sites hosted on WordPress.com, and you can check out the demo of the fantastic looking theme right here. This theme looks fantastic, and the thing I like about it is that WordPress.com looks at the whole Blogosphere and recognizes that there are people looking to create professional WordPress themes, so good on you guys, WordPress!
It’s free, and it’s the new default WordPress theme when you sign up for a brand new WordPress blog. Personally, I think it looks really clean, elegant and well-rounded in terms of features. It boasts of excellent customizability, and it is something that we will see a lot more people use in the very near future.
It is not quite available for people who have self-hosted WordPress blogs just yet, although one would think that the WordPress 3.5 update is coming up really soon, with the Twenty Twelve theme set to be unveiled to the general public at that time.
Perhaps something that many people on the internet want to know, this would be how to create those images with captions like “like my status and you’ll get 999 friend requests like me”.
The thing is, it’s really easy to do!
You can also do this with your notifications and messages too!
First step: Log into Facebook

Second step: Double right click the friend requests and click on ‘Inspect elements’. (Windows)
You will get something like this:

Or basically, a lot of mumbo jumbo that you guys really don’t need to know about.
Step 3: UseControl+F for non-mac users, and you can see that you can search the mumbo jumbo for specific things. Then enter “<span id=”requestsCountValue”>. This is something like what you should get:

Step 4: Double click on the number, and change the value! There you go, all done!
So, I’ve posted about how to install WordPress themes and plug-ins, the best plug-ins and themes in the business, along with fancy ways to get money online. Now begs the question.
Is there anything else you guys want to learn how to do? I’m open to teaching you guys how to do it, just leave a comment in the comments section below, and I’ll answer it promptly.
I guess I’ve been through what I thought were the best plug-ins around, I think it’s about time I explained how to install those plug-ins.
There are a few ways to go about is, so I’ll just be going through the main ones here.
Search for It
Perhaps the simplest way to install a plug-in on your self hosted WordPress powered blog (please note that these tips only apply to your self hosted WordPress blog). What you’ve gotta do is find ‘Plugins’ on the left sidebar, scroll over it, and then click on ‘add new’.
From there, you just have to search up the plugin that you want to install, and then with a click on the button ‘Install Now’, you’ve just installed a plug-in for your WordPress powered blog. Please do note that you should activate it and check the settings upon installation.
Zip File Method
The second method is quite simply seeing you get the file for the plugin, whether it be in zip file or non zip file (normally it comes in a zip file). And if it isn’t, you’ve quite simply gotta zip the plugin folder up. For Macs, you can just install ‘iZip’, an application to zip files up. For Windows/other system users, it should be fairly straightforward. L
Lastly you’ve gotta on your dashboard, go into the ‘Plugins’ section and click ‘add new’ once again. Then they will give you an option to upload. Click on that and then upload your zip file. Simple, straightforward.
Hoped that you guys found this helpful. 🙂
