Here are my favourite free WordPress themes of the month, most of them are responsive and I use loads of these for my websites.
1. Origin

2. NewsTheme

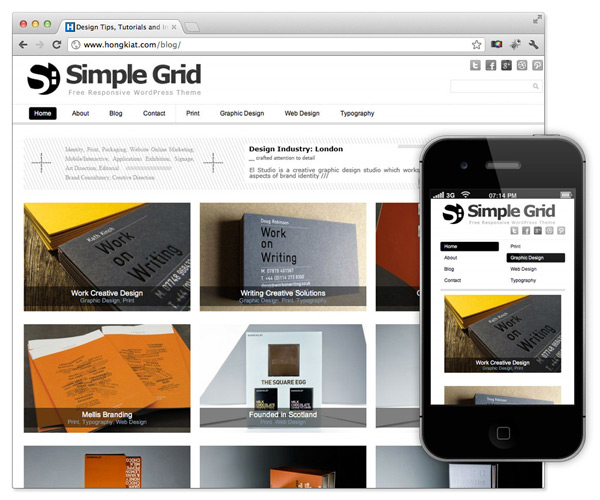
3. SimpleGrid
4. Desire

5. Path

Here are my favourite free WordPress themes of the month, most of them are responsive and I use loads of these for my websites.
1. Origin
2. NewsTheme
3. SimpleGrid
4. Desire
5. Path
A lot of people ask how to change the icon, or the favicon rather, of a WordPress blog, so here are a few easy ways to do this.
 I’ll be talking about how to change your Favicon on a self-hosted WordPress blog (this being the one with your own domain) and then I will move on to how you can change it on a WordPress hosted blog.
So, what exactly is that Favicon? It’s that icon beside your address, tiny detail, but it is attention to small detail that is essential to standing out on the internet.
![]()
Beside the website address, there is an icon, and that’s what I’m going to help you change it.
Method 1: A Plug-in (Self-hosted)
The plug-in is called WSA Favicon, and it is the most credible Favicon altering plug-in there is on the market. It is very easy to do, and quite simply, very self explanatory.
Method 2: Coding (Self-hosted)
Everyone’s scared to code. I know that. Even I am. But this is really easy. First of all, you’re going to have to get a 50×50 picture and either upload it on the internet, or have it ready. (you can just do a google search and use that address). So you’re going to need that address for the next step.
Next, you’re going to need to go to Appearances > Editor , and then you’re going to stick this code <link rel=”shortcut icon” href=”faviconpath” />. The “faviconpath” part is where you need to replace with the url of where your image is located. Easy.
Method 3: WordPress.com Users!
Very easy. Go to Settings > General . On the right hand side of the image, there is a part that says “Change Blog Icon/Picture”. Upload your picture there, and you’re ready to go!
Hey guys, today I’m going to be talking about the highly anticipated release of the Twenty Twelve WordPress theme.
First of, I would just like to announce that the theme has been made available on sites hosted on WordPress.com, and you can check out the demo of the fantastic looking theme right here. This theme looks fantastic, and the thing I like about it is that WordPress.com looks at the whole Blogosphere and recognizes that there are people looking to create professional WordPress themes, so good on you guys, WordPress!
It’s free, and it’s the new default WordPress theme when you sign up for a brand new WordPress blog. Personally, I think it looks really clean, elegant and well-rounded in terms of features. It boasts of excellent customizability, and it is something that we will see a lot more people use in the very near future.
It is not quite available for people who have self-hosted WordPress blogs just yet, although one would think that the WordPress 3.5 update is coming up really soon, with the Twenty Twelve theme set to be unveiled to the general public at that time.
So, I’ve posted about how to install WordPress themes and plug-ins, the best plug-ins and themes in the business, along with fancy ways to get money online. Now begs the question.
Is there anything else you guys want to learn how to do? I’m open to teaching you guys how to do it, just leave a comment in the comments section below, and I’ll answer it promptly.
I guess I’ve been through what I thought were the best plug-ins around, I think it’s about time I explained how to install those plug-ins.
There are a few ways to go about is, so I’ll just be going through the main ones here.
Search for It
Perhaps the simplest way to install a plug-in on your self hosted WordPress powered blog (please note that these tips only apply to your self hosted WordPress blog). What you’ve gotta do is find ‘Plugins’ on the left sidebar, scroll over it, and then click on ‘add new’.
From there, you just have to search up the plugin that you want to install, and then with a click on the button ‘Install Now’, you’ve just installed a plug-in for your WordPress powered blog. Please do note that you should activate it and check the settings upon installation.
Zip File Method
The second method is quite simply seeing you get the file for the plugin, whether it be in zip file or non zip file (normally it comes in a zip file). And if it isn’t, you’ve quite simply gotta zip the plugin folder up. For Macs, you can just install ‘iZip’, an application to zip files up. For Windows/other system users, it should be fairly straightforward. L
Lastly you’ve gotta on your dashboard, go into the ‘Plugins’ section and click ‘add new’ once again. Then they will give you an option to upload. Click on that and then upload your zip file. Simple, straightforward.
Hoped that you guys found this helpful. 🙂
So, you want to advertise your product/service/website on the internet, so which way would be the way to go? I will try and help you come to a decision.
What I’d like to make clear here is that I personally don’t have a stance on which one is the better advertising network – both are fantastic and have their own pros and cons – I’m only here to provide you insight on the two, to help you guys decide who to advertise with.
Google AdWords
The Pros:
Especially for businesses that are run locally, Google AdWords can be really powerful, because they place their advertisements based on where you are in the world, and this can be really powerful for local businesses or websites that are aiming a particular demographic.
Furthermore, let’s say you run a Bak Kut Teh shop. A person would be able to quite simply search up the words “Where to Eat Bak Kut Teh in Kuala Lumpur” and your ad would pop up. There would also be a high conversion with the Google AdWords method.
Unlike Google AdSense, where you have people bid for the advertisement, Google will select which categories you fit into and that would ultimately be where you are advertising. No need to spend hours finding the best places to place your ad, and quite frankly, it’s really easy to manage.
The Cons:
Google uses the ‘Pay per Click’ concept, and that will be really hard to understand at first for beginners, for experts, less so. This is because Google sorta ‘guesses’ which category your advertisement fits into, sometimes falling under the wrong search term.
This is precisely why so many people are losing money to advertising on Google. People are not getting what they want out of their advertisements in terms of results.
Advertising on Facebook
The Pros:
That’s a whole lotta people that you can literally handpick from, especially since Facebook does offer demographic targeting – you can pick age, gender, education and pick a few common likes that they have, so generally the people that see it are interested in the advert
This one really requires no explanation. You have to pay very little per click, and essentially, you are the one making more money out of it if you know how to use that traffic.
The Cons:
In my opinion, the biggest con about advertising with Facebook. The fact remains that when you’re on Facebook, you’re not there to buy a product. You’re there to chat with friends or quite simply update your status. Little attention will be paid to the advertisement. But at least there’s that pay per click option, so I reckon it’s worth trying out for you too.
So, what do you guys think? Advertising with Facebook or Google AdWords. Leave your thoughts in the comments section below 🙂
So, by now you’ve heard of copyright. And I completely respect it. Stealing other people’s work is absolutely wrong, so here I will teach you guys where you can get free and perfectly legal photos from the net.
Please do note that attribution is required on most of the photos, given that realistically they need the credit to realistically make it legal. The watermarks on these photos have been made as unnoticeable as possible – at least according to them. I’m just going to make a list of the top
One question that always comes to me is, why make the shift from a regular WordPress blog to a self hosted WordPress powered site. I will explain a few of the reasons right here.
Customizable
Essentially, what you get from WordPress is the ability to use scripts in your WordPress blog. With your regular WordPress.com , you are essentially limited to images that you add to the website or quite simply the widgets that they already provide.
With your own self hosted WordPress blog, you can select your theme (from an internet full of possibility), and you can select all the themes available in the WordPress database, along with the rest of the free themes out there. Furthermore, you can add toolbars among other interesting scripts to your blog.
Essentially, if you have an eye for detail and you want that awesome layout, that is the way for you.
Ads
Even if you upgrade to your own domain with WordPress.com, your ability to make money is very, very limited. Either you pay something like 2000 dollars a month for the VIP package or become one of the select few (and they are very, very selective) to join their premium ad network, and you seriously have got to have the traffic to join that group.
With your self hosted blog, you can add scripts and you really can add any type of advertising you want. From Google AdSense to AdBrite to even those in-content ads from ad networks such as Kontera and InfoLinks, the possibilities are virtually endless.
Money making is quite frankly much easier. You can make up your money really easily!
Branding
Come on, you don’t need me to explain this. With your own domain, the name of the website is much cleaner. Tell me, is bbc.co.uk easier to remember, or is bbc.wordpress.com easier to remember? So that’s simply the reason behind getting your domain.
It’s just more catchy!
Plug-ins!
Come on, everyone loves plug-ins! From the related post plug-in of LinkWithin to the SEO plug-ins that will help you get those searches in.
Any more questions, just leave a comment in the comments section below, would be happy to answer any questions! 🙂
Lesson 2 of my content school, and it is to produce valuable content for your audience. Something that they would want to recommend or quite simply share.
If you want to have a loyal readership, this one is absolutely key. Essentially, I think that a good readership is far more powerful than producing timeless content. The reason is simply because with timeless content, you’re relying literally 100% on Google (well, other search engines count too, but I guess it works out in the end).
You need to produce content that is contemporary yet something that can be easily understood even within a couple of year’s time, that would essentially be the best way to make money on the internet – producing a solid readership, along with getting those searches in to bring new readers.
This is actually one of the principles that I always write my blogs with, reason being that if people find the content valuable, they will return and even subscribe – which is ultimately my aim. To get new readers, and keep them on the website in the future. It’s what my target is, and realistically, it should be what you guys are targeting as well.
Top news agencies and blogs all have editors in all sorts of departments simply to avoid a PR disaster – something that will cause the website/news agency to lose their reputation. That’s the very reason why putting out valuable but factual information is so important. Opinion doesn’t count in this case, because it’s quite simply you putting your point of view across.
Hey guys, here’s another post from me teaching you guys how to add Facebook and Twitter widgets straight into the sidebars of your websites.
Adding Twitter
If you are having a self-hosted WordPress site, it is quite straightforward, reason being that you quite simply can add scripts to your website, so this is generally what the code should look like.
Quite simply, you can just go right here to install it.
The pros of Twitter? Well, generally, if you write about something interesting, it CAN (has the potential) to spread like wildfire, like seriously. Once you build-up a loyal following, you can really get your messages across to completely different people.
Adding a Facebook Widget
I personally like the classic ‘like’ button, so here’s the link to make that like button for your WordPress site. I recommend using the Wibiya toolbar if you want to implement both the Twitter follow button along with the Facebook like button, reason being that it will take up much less space, and it is much easier on the eye.
Pros of Facebook? People are more likely to actually read your post if they like your page. It’s simple as that, really.
